Tuesday, May 31, 2011

FFFC #57 Process continues


Here's where I left off yesterday.  I had to break and read some handy instructions I had printed out for how to make different types of backing from tutorials on Susan Brubaker Knapp's site. I sort of screwed up by not leaving excess around the edges for seam allowance when finishing.  (I ALWAYS do this, when will I learn?)   I want to do a pillowcase, as it's the easiest and quickest.  This is what I originally did on Cloister, and also City Hall.  I was surprised to read in her instructions that she completes the backing, then does the quilting.  I guess if you quilt neatly enough, it's okay.  I had been quilting through an thin piece of an old sheet as a backing, then adding the pillowcase over it.  This will be interesting!

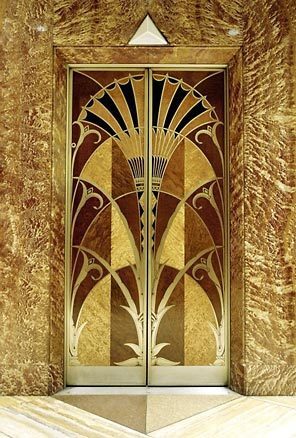
The design has morphed a little bit.  Once I had the background pieced as I showed at the end of the last post, I laid a piece of freezer paper over it, and tried to eyeball a sketch of the design from my sketchbook, at about double it's original size.  (The finished piece will be about 10 x 16.

It's not quite as elongated as the photo would imply,
but I did end up making the base larger than the sketch.


Since the proportions were different, I had to add to the design a little bit, so I created a flower emerging from the fan.


I also added the little zigzags at the upper corners.  Then I started cutting up the freezer paper and building the pieces in sections.  The zigzags were easy, though I should have realized that they were not exact mirror images.  Oh well, too lazy to change, I like a little asymmetry now and then.  None of it was too difficult, though I'm glad I had this photo snapped, because it became a little confusing to assemble after my pattern was gone.  I didn't think I needed to trace it all over again...  But with a more complex project I certainly would.

Well, if I hurry I can get almost an hour more in before I head to work.  

Monday, May 30, 2011

FFFC #57 Process


I love Art Deco, so my biggest challenge with this challenge was narrowing down and focusing on one thing.  I spent some more time browsing books and pictures on Pinterst and sketching some designs... 
 
I really like the basket-weave texture I see in a lot of the ornamental designs,
but I'm not sure it would translate to "Deco" in fabric. 
 One photo that kept catching my attention was this one of the Chrysler Building elevator doors.  
Elevator, Chrysler Building, NYC, New York
You won’t find elevator doors like this just anywhere!


So I played with some ideas of the contrasting
background with curvy swirls over it...
Trying to remember to keep it simple...

Some sketches just didn't gel at all!  

I finally settled on this simple (ha) idea.


My first plan was to piece the background out of strips of fabric.  Oh yeah, that curved piecing thing -  not working.  gave up on that and started fusing today.   Here's where I am at the moment, finally done with the background, and ready to add the fan.


Saturday, May 28, 2011

City Hall again

I saw that someone else had posted an older piece that they thought met the challenge.  I really wanted to post "City Hall" because (a) it totally meets the challenge, and (b) I'd like some feedback on it.  But after getting it out, ironing it and rephotographing it, I read the comments and saw that the other person was gently reminded that it would be good to see something new.   Of course City Hall is new to the FFFC audience.   But my tender feelings will be easily hurt if I'm criticized, and I know we are really not supposed to post older stuff.  So maybe I'll link to it with my new (if I make one) entry, but here's how it's looking after added quilting to the sky and the stonework.
I sure wish I could take better photographs.  Natural light would help, but of course it's too wet out for that.  We've had over 4" of rain this month, double the usual for May.

I'm going to work on sketching out an abstract geometric Art Deco design I think.  I spent a lot of time looking at books last night, and pinning interesting photos on Pinterest.  I LOVE that site!  I created a "Deco Challenge study board" and anything I see that interests me, I can stick it up there for later reference.

Friday, May 27, 2011

Art Deco!


I'm excited - the May FFFC challenge is Art Deco, my all-time favorite architectural style.  I could just submit "City Hall" but I'm eager to do another deco style quilt.  Instead of an actual building I think I'll just do a graphic piece based on some of the ornamental elements like terracotta designs and metalwork.
Art Deco detail on 2767 N. Milwaukee Ave., photo by CCL, 2004
This, from Chicago (CityofChicago.org)

This one is from Hueamour.com:  Miami, I think.


Wednesday, May 25, 2011

Completed Placemats

Finally some time to post these.  I finished quilting the last two yesterday.   As always I learned things.  You should quilt first, square up later.   Well, that makes perfect sense on an ordinary quilt, but if you need to pillowcase the fronts and backs together before quilting, then you are stuck with whatever distortion your quilting causes.  I also learned simple is better (for the 1,000th time!!)  I like the simple ones much better than the overdone complicated ones.   Here they are - both sides of each.  I'm sorry, but I just can't get them to line up nicely.  I've wasted way too much time trying!!


 Then I worked on adding more quilting to the Brown Bag.... it really needs it.  I want to outline each inner square with ditch stitching, then do some hand quilted hearts and flowers in some of the white squares. 


I've also been spending time - and money - in tracking down supplies for the workshop next month.  Of COURSE I bought more fabric - she mentions "hand dyes" in various values.  I think everything I bought is dark.  Then there were paints, which paints to buy?  Brushes, an extra pressing sheet, fuse,  more fuse... etc.  I still need to order some silk organza I guess, then I'll be done.  (Me, done early??  WTF?).


I got rid of that wild blog template.  It was way too distracting.  This one seemed simple, and appropro to the rain that Just. Won't. Stop.

Monday, May 23, 2011

Some Assembly Required....

That should be a warning to "run away."  But I didn't.  I'd been looking around for another storage piece that would fit in the last remaining open floor space of the dining room, and when this item appeared in the JoAnn sale flyer, it seemed perfect, dimension-wise, anyway.   I got home from the store with it about 2 o'clock, and expected to be happily organizing staff overflow by 3ish and sewing at 4.   Let's just say, I still haven't organized everything, since I only started an 8 pm.  :P  But it's done.  Thankfully the other was able to help with the drawers, but I did manage the rest of it by myself.


Sunday, May 22, 2011

New Background

I was tired of that standard Blogger background, so I thought I'd try something new.  This one will at least help wake me up in the mornings!  Place mats are all assembled, just need some quilting to be finished.


I think I'll see what Katie's reaction is before I also make a table runner!

Saturday, May 21, 2011

Slow week

I didn't get to sew all week.  Today I've completed two more place mats.  By making the fronts and backs independently and not worrying about squareness, it turns out one side or the other - or both - is not going to be square to the quilting.  But I didn't really plan for it to be.  They're just naturally sort of wonky.  I'm kind of bored with this part - so I think I'll work on something else.

Backs

Fronts

Monday, May 16, 2011

Something done

I did get one place mat completed last night.  Other than some puckering around the area where I stitched the opening closed, I'm pretty pleased with it.  This is one of my least-favorite, design wise.  I thought I was pretty smart coming up with the log cabin idea for my last piece, but the fabrics are too random, and not cohesive enough for me.  It's ironic - I look at quilts and projects that are made with nicely coordinated fabric lines, and think that's not really a challenge, because all the color and design work is already done for you by professionals.  But it looks good.  Can you argue with good?  


Glitches

Guess Blogger isn't the only one with technology problems.  I ran into glitches with my sewing machine and my printer yesterday.  Very frustrating and time wasting.   I bought a hard-shelled suitcase at Target and had tested out fitting the machine into it (tight but it may work).  I rolled it around a bit to test it.  When I got the machine back out and set up and started to sew, there were immediate problems with the bobbin tension.  I had been piecing just fine yesterday, but now was trying to quilt the placemats.  I finally got it back in action after trying all the typical solutions, but it made me wonder if it's really wise to transport it.  What choice do I have?  I don't trust UPS and I can't seem to find a good option in Cleveland or Columbus for renting one.


I also spent a lot of time without and conclusion reading about the conference and considering various travel scenarios.  I did discover a Yahoo Group for the symposium, which is NOT very well identified, just a link on a website saying, QSDS Connection.  Well who knows what THAT is supposed to mean?

Saturday, May 14, 2011

Finishing* the Placements

All but one mat is done.   Here's a shot of how I design as I go:   
I cut the largest remaining piece of the feature fabric (leaves) into three pieces, since I have three more mats to go.  There is more fabric if needed, but this seems to be a nice size to "feature" and still have other things going on.  I like a darker "edge" rather than letting the limey green run off the "page."  So I put a strip of this fabric that is left over from my purse and ruler bag.  I don't think I ever photographed the ruler bag...but I digress.  The next step was to add a horizontal strip of dots. I laid the pieces over my template and checked to make sure this piece of dotted fabric would fill the remaining horizontal dimension.  

I finished out the left side with some solids, I like the solids to frame or enclose the prints, usually.  

Then I tested to make sure the piece was at least as large as my template.  It's hanging out of each side, so it's big enough.  

I got bored with the big vertical piece of fabric, and wanted the next one to be something new, so I sliced it into four pieces.  

A few steps later, here's how that one panned out.  More to come... the UFO list has reached 20, and I need to SEW, not blog!!


*Note: Finishing, not "Finished."

Stash

While I was snapping pics of in-progress projects, I thought I might as well post a shot of my stash, since I had to unpack and reorganize everything I had taken to the classes.  It looks rather paltry in this picture, while in reality it seems absurd.   Of course this is only the fat quarter - half yard stash.  There is also:


The Scrap Bin, and...

The disorganized mess of larger fabric, in process projects and  thrift store finds.   Note the ziploc bag of fused scraps and tiny scraps, also carefully sorted and organized.  Why am I posting this?  I have no idea.  To embarrass myself into action?

Liberated Log Cabins

I made these six blocks in the workshop.
Well, good morning!  Yesterday was day three this week of having fun with fabric and creativity, and (almost) not thinking about work.  Yay.   It was extremely enjoyable and motivating.  Gwen Marston has a delightful style of teaching and a wonderfully quirky sense of humor.  She brought some of her earlier small quilts as well as newer ones where she's using one block for the whole piece.  Of course as soon as I saw it I had to buy her newest book, because there were so many more color-block type pieces.  These really motivated me.  


There was much less teaching time and more sewing time that in the Janet Fogg workshop, but I didn't really mind as I was eager to get to sewing right away when the ideas started to flow.  But I try to make a point of remembering in classes that I paid to be there hearing from the instructor, and learning from the other students' works and ideas, not to sit in a corner and sew, which I can (theoretically) do anytime. 
I also made 16 partial mini-blocks - One seems to be MIA


There were a few familiar faces from past classes and the guild, and it's nice to feel like I'm finally starting to get to know some other local quilters.  There was also a fair contingent of "in the box" people trying to figure out how to get out.  They all should get an A+ for effort because there was a whole wall full of really great blocks posted by the end of the day.  I'm off to get started on the weekend chores, then I'll be back to post photos.
Much as I want to jump back into my log cabin or my piece from the earlier workshop, I think I will buckle down and finish the placements first today.  I need to get that project cleaned up and off the table.  
Later:  Place mat piecing is finished.  I need to decide how to bind.  I don't think I can face  6 mats x 4 sides x 14" each = 336 inches of strip binding, so I will probably use a pillowcase type, with top stitching.


So as promised, here are some shots from the workshop:  First, some of Gwen's samples:
This is the one that made me want to try the small "half-cabins."  It's about  18 x 24, maybe less.

Another earlier piece.  
I think the big border helps calm the "wonkiness."

This one used a whole bunch of prints, many of them with stars.
Her current work is all in solids, and she's been playing with the idea of entire quilts being made up of one giant block: 

Here's one of her single block pieces, surrounded by some of the student work.

This student did a good job with the "giant block" theme.

Student work

More 

One of the nicest student projects

Some of the quilts in the book worked with very minimal color palettes, which I really admired, but couldn't see myself doing - at least not at this workshop...  Here's a very nice example.  
Really nice compositions and effective use of color.
I didn't photograph all of them, but it was very interesting to see how different they all came out,  here are a few more random shots.  I was surprised how many people chose to "fussy cut" from novelty fabric.  The last picture shows my favorite of this style, where she interspersed some white printed fabric in her bright blocks.